
Home Improvement Project Lifecycle Explained: 2026 Guide
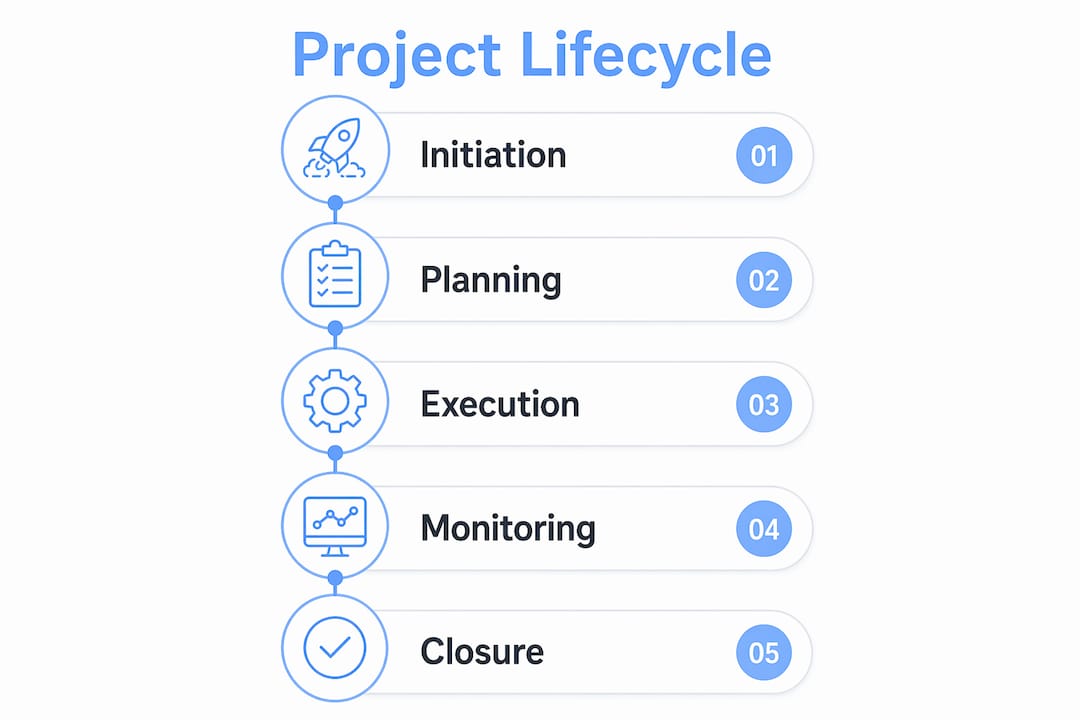
Every home improvement project, whether a bathroom refresh or a whole-house renovation, follows the same five-phase lifecycle: initiation, planning, execution, monitoring and control, and closure. Understanding this framework before you hire anyone or swing a single hammer is what separates projects that land on time and on budget from those that spiral into costly, stressful ordeals.
Here is a quick overview of each phase:
- Initiation: Define your goals, document existing conditions, and write a clear project brief covering scope, rooms, finishes, and budget targets.
- Planning: Set a realistic timeline, build a detailed budget with a contingency fund, secure permits, and coordinate contractor procurement.
- Execution: Manage active construction using a strict inside-out, structural-to-cosmetic sequence with regular contractor communication.
- Monitoring and control: Conduct inspection milestones between construction sub-stages, track variations, and manage scope adjustments in real time.
- Closure: Complete a punch list walkthrough, collect lien waivers, and document warranties and as-built drawings before releasing final payment.
This lifecycle draws on established project management frameworks, including the RIBA Plan of Work and the AIA’s approach to substantial and final completion, both of which structure residential construction around gated milestones rather than open-ended timelines. The home project planning checklist at Bidwolf applies the same logic to everyday renovation projects.
What happens during the project initiation phase?
The initiation phase is where your renovation either gets set up for success or quietly set up to fail. This is the step where you translate a vague idea (“we need a bigger kitchen”) into a written, agreed scope that a contractor can actually price and build.

Start by documenting existing site conditions: measure every room in scope, photograph current finishes and problem areas, and write down the functional issues you want solved. A leaky shower, a cramped layout, outdated wiring — these are the problems your project brief must address. The brief itself should list the rooms involved, the finishes agreed upon, the target budget with a contingency line, and the expected start and handover dates.
Unclear scope at this stage has a direct cost. Any design change made after demolition begins costs far more than the same change made on paper during initiation. Contractors are unanimous on this point: front-loading concept agreement is the single most effective way to prevent mid-project change orders and budget overruns.
Key initiation tasks to complete before moving to planning:
- Write a one-page project brief and update it weekly throughout the project.
- List must-have outcomes separately from nice-to-have upgrades.
- Identify any structural, plumbing, or electrical constraints that will shape the design.
- Decide early whether you need an architect, designer, or structural engineer.
- Set a realistic budget ceiling before contacting any contractors.
Pro Tip: Front-load the concept phase. Every hour spent agreeing on a kitchen layout before demolition saves roughly five hours of on-site rework after cabinets arrive.
How to plan your home renovation: timelines, budgets, and resources
Planning transforms your project brief into a buildable, fundable schedule. This is where most homeowners underestimate the time required. Expect at least six to eight weeks of upfront planning for a smaller remodel and three to five months for a larger project, covering budget finalization, design, contractor hiring, and material ordering.

Typical timeline ranges by project type
Mid-to-large renovations typically span 20–55 weeks from first conversation to move-in. A single bathroom runs 6–8 weeks on site after a 4–6 week design and procurement lead. A kitchen-and-living refresh is 16–20 weeks end to end. A whole-house renovation is commonly 6–12 months. Design and drawings alone usually require several weeks depending on complexity.
| Project type | Typical on-site duration | Design and procurement lead |
|---|---|---|
| Single bathroom remodel | 6–8 weeks | 4–6 weeks |
| Kitchen and living room | 16–20 weeks | a few weeks to a couple months |
| Whole-house renovation | 6–12 months | a few months |
| Room addition | several weeks | several weeks to a couple months |
Budgeting best practices
Sound budgeting starts with three principles. First, carry a contingency fund of 10%–20% of your total budget to absorb hidden costs like old wiring, water damage behind walls, or a damaged tile delivery. Second, keep your total investment below 30% of your home’s current market value to protect resale equity. Third, break the budget into line items by trade and update the working total every time a variation is approved.
Key planning tasks before construction begins:
- Lock the design completely, down to hardware and paint colors, before any demolition starts.
- Submit permit applications as early as possible, ideally while finalizing the contract.
- Order long-lead items (cabinetry runs 6–14 weeks, stone countertops add another 2–3 weeks) the same week you submit for permits.
- Sequence contractor bookings around permit approval dates, not wishful start dates.
Pro Tip: Maintain a single unified plan that syncs scope, budget, and schedule from design through handover. Poor renovation outcomes almost always trace back to managing these three elements separately, with no one updating the master plan after week one.
Managing contractors and construction sequencing during execution
The execution phase is where your plan meets reality. Active construction management means enforcing a strict build sequence, coordinating multiple trades, and keeping communication tight enough that small issues never become expensive surprises.
The standard build order is not a preference. It is a dependency chain: demolition, then structural and framing changes, then rough-in trades (HVAC ducts first because they are the bulkiest, then plumbing, then electrical), then insulation, then drywall, then finishes. Inside-out, structural-to-cosmetic sequencing exists to prevent rework. Install new flooring before the rough-in inspection passes, and you will pull it up again.
Communication is the other half of execution management. A 30-minute weekly site meeting with your contractor, combined with a shared document listing the top five open decisions (each with an owner and a required-by date), prevents most decision delays. Decisions left unresolved for more than a week tend to become project delays. Keep a live variations log from day one: a dated record of every change agreed after contract signing, with the cost impact and schedule impact noted for each.
Common execution pitfalls to watch for:
- Allowing trades to work out of sequence to “save time.”
- Approving verbal change orders without a written cost and schedule impact.
- Skipping or delaying inspections between construction sub-stages.
- Failing to confirm material delivery dates before scheduling trade crews.
- Letting open decisions sit longer than one week without resolution.
For projects involving HVAC work, knowing the HVAC contractor red flags to watch for during execution can prevent costly compliance issues down the line.
Key insight: Performing tasks out of sequence, such as installing drywall before passing rough-in inspections, forces costly teardown and adds weeks to the schedule. Strict sequencing is not optional.
How inspections and quality control keep your project on track
Inspections are gated milestones, not formalities. Each one clears the way for the next construction sub-stage, and skipping or rushing them means non-compliant work must be uncovered and fixed after walls are already closed. That is one of the most expensive mistakes a homeowner can make.
Managing deviations requires a documented variations log. Every change to scope, materials, or schedule gets recorded with a date, a cost impact, and written approval before work proceeds. Most renovation disputes come from undocumented variations. A live log, maintained from week one, prevents almost all of them.
Key inspection milestones and their typical timing:
- Rough framing inspection: After structural and framing work, before mechanicals begin. Checks lumber sizing, load paths, fire-blocking, and connectors.
- Mechanical, electrical, and plumbing rough-in inspection: After all rough-in trades complete their work, before insulation goes in. Checks wire sizing, drain slope, pressure tests, and duct routing.
- Insulation inspection: After insulation is installed, before drywall is hung. Confirms correct R-value and completeness.
- Final inspection: After all work is complete. Confirms everything was built per approved plans and relevant codes, and precedes the certificate of occupancy where one applies.
Quality assurance between inspections means physically checking contractor work against the approved drawings before calling for an inspection. A third-party inspector can also review work independently before the contractor declares it complete, catching errors while they are still within the warranty period and easy to fix.
What the project closure phase actually involves
Closure is where your leverage as a homeowner is highest, and where many people give it up too early. Two definitions matter here. Substantial completion means the space is functional for its intended purpose, even if minor items remain. It typically starts the warranty clock. Final completion means every punch list item is resolved and all paperwork is delivered. Final payment is triggered only at final completion, not before.
The punch list walkthrough happens near the end of construction. Walk every room with your contractor, document each deficiency with its exact location, a description, and a photo, and agree on a fix date for each item. Work through it systematically: paint touch-ups, door and drawer alignment, outlet and fixture function, plumbing fixtures for drips, caulking and grout lines, HVAC vents and thermostat operation, and window seals and weatherstripping.
Your financial protection at closeout depends on four things:
- Retainage: Withhold 5%–10% of contract value until closeout is genuinely complete.
- Lien waivers: Collect them from the general contractor and every subcontractor and supplier before releasing final payment. Mechanic’s liens can be filed weeks or months after work ends in many states.
- Final inspection and certificate of occupancy: Required for major remodels; a missing permit can block the certificate and create problems at resale.
- Documentation package: Warranties, product data sheets, and as-built drawings. Warranties typically start at substantial completion, so confirm the date.
Common lessons homeowners carry into future projects:
- Lock all design decisions before demolition, not during construction.
- Order long-lead materials earlier than feels necessary.
- Maintain the variations log from day one, not after the first dispute.
- Never release final payment without a signed punch list and lien waivers in hand.
Industry benchmarks on timelines, budgets, and common pitfalls
The data on renovation timelines is consistent across the industry. A single bathroom runs 6–8 weeks on site after a 4–6 week design and procurement lead. A kitchen-and-living refresh is 16–20 weeks end to end. A whole-house renovation is commonly 6–12 months. The phases that most homeowners rush, specifically discovery, design, permits, and procurement, are where the majority of timeline failures originate.
Budget discipline follows a similar pattern. The recommended contingency is 10%–20% of total budget, with the higher end applying to older homes or anything with structural unknowns. Keeping total investment below 30% of the home’s market value protects equity. Homeowners who run over budget typically compare variations against the original estimate rather than the live working total. Update the working total every time a variation is approved.
Top coordination challenges and how to address them:
- Out-of-sequence work: Enforce the structural-to-cosmetic build order without exceptions.
- Procurement delays: Order long-lead items the same week permits are submitted, not when construction starts.
- Decision bottlenecks: Assign an owner and a required-by date to every open decision at each weekly meeting.
- Undocumented changes: Log every variation with cost and schedule impact before approving it.
- Permit underestimation: In most jurisdictions, permit approval for medium-to-large projects takes 2–6 weeks; some high-volume metro offices run longer.
Key insight: Experts advise resisting early finish purchases except for long-lead items identified during design. Buying finishes too early creates storage problems and increases the risk of damage before installation.
Pro Tip: Use a single digital project management tool, whether a shared spreadsheet or a dedicated renovation app, to hold your brief, fixture schedule, timeline, and variations log in one place. A scattered notes app rebuilt from memory mid-build is one of the most common sources of project drift.
For a detailed walkthrough of the planning steps, the home renovation checklist at Bidwolf covers the 2026 essentials from scope lock through handover.
Why sustainability and energy efficiency belong in your project plan
Energy efficiency upgrades deliver some of the strongest long-term returns of any home improvement investment. The National Association of Home Builders lists improving energy efficiency with new windows, doors, insulation, and climate control systems among the top reasons homeowners remodel, alongside adding space and increasing resale value.
The planning phase is the right time to evaluate these upgrades, not after construction begins. Adding insulation, upgrading HVAC systems, or replacing windows is far less expensive when walls are already open during rough-in than as a standalone project later. Coordinate with your contractor during the design phase to identify which energy upgrades align with your scope and budget.
Practical sustainability considerations to build into your project:
- Specify insulation R-values that meet or exceed current IRC minimums for your climate zone.
- Evaluate ENERGY STAR-rated windows, appliances, and HVAC equipment during the fixture selection phase.
- Ask your contractor about air sealing opportunities while walls are open during rough-in.
- Consider low-VOC paints and finishes, which improve indoor air quality without adding cost.
- If your project involves an HVAC replacement, confirm the new system is sized correctly for the renovated space, not just the existing one.
Green home remodeling also has permit implications. Certain energy upgrades, particularly HVAC replacements and window enlargements, require permits and inspections in most jurisdictions. Factor permit timelines into your procurement schedule accordingly.
Find the right contractor for every phase of your project
Every phase of the home improvement lifecycle depends on having the right licensed professionals on site at the right time. Bidwolf connects homeowners with vetted, verified local contractors across Texas, making it straightforward to post your project, receive competitive bids, and compare credentials before committing.
Whether you need a general contractor for a whole-house renovation or a licensed electrician for rough-in work, post your project on Bidwolf and get bids from qualified local tradespeople fast. You can also browse verified local contractors by trade and location to find the right fit for your specific project phase.
FAQ
What are the five phases of the home improvement project lifecycle?
The five phases are initiation, planning, execution, monitoring and control, and closure. Each phase produces a tangible outcome, from a written project brief through to a defect-free handover with documented warranties.
How long does a mid-to-large home renovation typically take?
Mid-to-large renovations typically span 20–55 weeks from first conversation to move-in. A single bathroom runs 6–8 weeks on site; a kitchen-and-living refresh takes 16–20 weeks; a whole-house renovation commonly runs 6–12 months.
How much contingency should I budget for a home renovation?
Budget a contingency fund of 10%–20% of your total project cost. Use the lower end for well-defined projects in newer homes and the higher end for older homes or anything involving structural unknowns.
When should final payment be released to a contractor?
Release final payment only after a documented punch list walkthrough, confirmation that all deficiencies are resolved, and receipt of lien waivers from the general contractor and all subcontractors and suppliers.
Do I need permits for a home improvement project?
Most projects touching structure, electrical, plumbing, mechanical systems, or the building footprint require permits. Cosmetic work like painting, trim, and same-location fixture swaps is generally exempt, but requirements vary by jurisdiction. Your contractor should pull trade permits; confirm this before signing any contract.
Key Takeaways
A successful home improvement project requires a unified plan that keeps scope, budget, and schedule in sync from the first sketch through final payment.
| Point | Details |
|---|---|
| Five-phase lifecycle | Every renovation follows initiation, planning, execution, monitoring and control, and closure, regardless of project size. |
| Contingency fund | Budget 10%–20% of total project cost for unforeseen issues; keep total investment below 30% of home market value. |
| Inspection milestones | Never skip or rush inspections between construction sub-stages; non-compliant work behind closed walls costs far more to fix. |
| Unified plan discipline | Managing scope, budget, and schedule separately is the leading cause of poor renovation outcomes. |
| Final payment protection | Withhold final payment until punch list sign-off, lien waivers, and the full documentation package are in hand. |